
In Cerivo Advance, we have three user roles: Superuser, Manager and Learner. The user roles are assigned on a user level, and a user can have multiple roles assigned to them.
- Superuser: full administrative access of your organisation's Cerivo Advance environment, including user management, course enrolment, and reporting across the entire organisation.
- Manager: can view the progress of learners assigned to them as direct reports.
- Learner: can access courses, track their own progress, and view completed courses and certifications.
In this article, we will deepdive into the Superuser role.
Accessing the Admin hub from Cerivo Advance
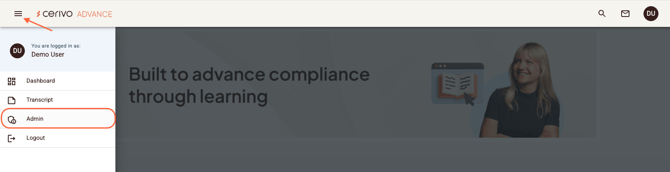
Once you log in to your Cerivo Advance learning environment, you will land on the dashboard page. To navigate to the Admin hub, click on the hamburger menu and choose Admin. Only users with Superuser access will have the menu item and access to the Admin hub.
To return to Cerivo Advance (learner experience), click on the Account icon on the top right corner and choose Learner Experience. Under Account is also where you can activate Accessibility settings, Change Password and Logout. Next to the Account icon, you can see Messages and Help & Support. Please note, that these are connected to our platform provider, Absorb. In case of issues, please contact your CSM or Cerivo support: support@cerivo.com.
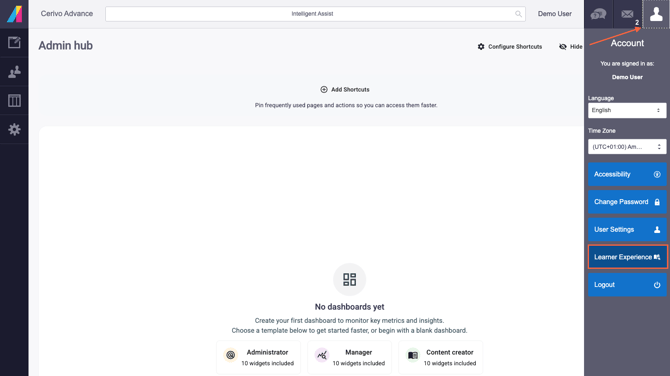
The Admin hub Dashboard page can be customised with widgets. Choose from the Administrator or Manager template and create and configure shortcuts. You will get insights from your organisation's users, overall course enrolment and progress statuses, etc.
The left side menu consists of four items: Courses, Users, Reports, and Setup. Let's have a look at each one.
Courses

Course management in Cerivo Advance consists of Courses, Tags and Course enrolments. You can draw reports from here by selecting the generate report icon. Customise the report by selecting relevant rows and filtering and sorting the columns. You can also save customised report layouts by clicking the report item and pin them.
Courses
The first menu item within course management, Courses, shows all the courses that your organisation has access to. View all courses available in the learning platform, including course type, category, status, enrolments, and activity. This report helps administrators manage and monitor course offerings.
By default, all courses are available for both you as a Superuser via the Admin hub. Managers can also enrol their direct reports in courses via the Manager experience. As a Superuser, you can enrol users and create course bundles and curriculums and add different enrolment rules and automation if relevant. Note that editing course content is kept within Cerivo to avoid confusion.
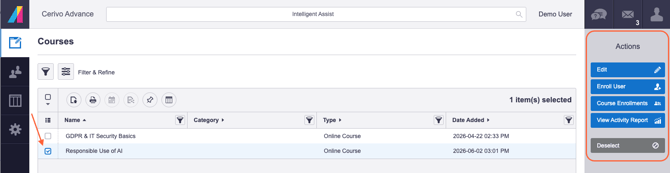
If you have selected a course, the right side Actions menu will allow you to:
-
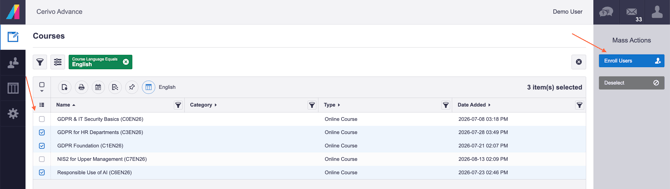
enrol users individually to the selected course by clicking Enrol User. Then, choose the user(s) you want to enrol in the course. You can also enrol them in multiple courses at once by clicking Add Courses, or by selecting multiple courses on the Courses overview.
- view all course enrolments of the selected course and create reports by clicking Course Enrolments.
- view the activity report of the selected course and create reports by clicking View Activity Report.
You can also select multiple courses at ones to enrol users to.
Cerivo Advance also supports a range of enrolment and learning path options that can help automate training assignments and create a more structured learning experience. While these features are configured by the Cerivo team, we can enable and tailor them to meet your organisation's needs.
Examples include:
- Automatic enrolment based on department, location, language, or other user attributes.
- Self-enrolment options that allow learners to enrol themselves in selected training.
- Manager enrolment capabilities, enabling managers to assign training to their teams.
- Learning paths that guide learners through training in a specific order, from foundational to more advanced topics.
- Mandatory prerequisites, ensuring learners complete required courses or certifications before accessing additional training.
- Completion deadlines and reminders to support compliance and training completion targets.
- Approval workflows where training requests require approval from a manager or administrator before enrolment.
For example, we can automatically enrol all employees in mandatory compliance training, assign role-specific learning paths to IT or HR teams, or make optional courses available for self-enrolment.
If you would like to implement any of these enrolment rules or learning path features, please contact your CSM and we can help configure them for your learning environment.
Course Enrolments
To see the Course Enrolments report, choose a course you want to see the enrolments report from the top of the page and then you can view enrolment data on all users. You can also enrol users via the Actions menu here. When selecting a user, you can enrol them to the course and you also have some user management actions here that will be explained in more depth in the next section.
Users
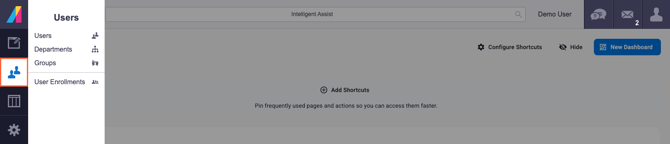
User management in Cerivo Advance consists of Users, Departments, Groups and User enrolments. You can draw reports from each by selecting the generate report icon. Customise the report by selecting relevant rows and filtering and sorting the columns. You can also save customised report layouts by clicking the report item and pin them.
Users
The first menu item within user management, Users, shows all the users in your organisation. View and manage all users within the learning platform, including account status and learner information.
This is where you can manually add users in case you are managing users manually instead of by SCIM user provisioning using Microsoft Entra ID. You can ask more about SSO and user provisioning from your CSM.
Adding users
Start by clicking Add User in the Actions menu on the right.

When adding users, you must fill out all the fields that are (Required) and Email:
- First name
- Last name
- Email address
- Username: we recommend always using email address as username
- Password: use a randomly created password. The user will always be prompted to create a new password in an email that will be sent to them before they log in for the first time.
- Department is either the organisation's main department or if you have sub-departments, choose the relevant one. You can also Edit User later on to correct or add information.
- Make sure that the user is receiving the new user email under Messages. The new user email can also be sent later on by selecting the user(s) in the users list and choosing Reset Password in the right side Actions menu → Select Message: Send New User Message.This is also where you can choose to Send Password Reset Message to any user.
- Is Active should always be toggled on, unless you want to create inactive users.
- Under Account, make sure that the Learner role is toggled on, meaning that the user can access the learner portal, where they take the courses. In case you need to create new users with Manager or Superuser access, contact your CSM.
When you have selected a user or multiple users, you have a lot of Actions items on the right side menu. You can, for instance, duplicate or merge the user, view their user transcript, enrol them to courses and view enrolments, activity feed and groups they are in.
Departments
In Departments you can view your organisational structure in Cerivo Advance. Editing or creating new sub-departments is done internally in Cerivo, so in case you need changes, contact your CSM.
Groups
In Groups, you can create user groups based on either manual or automatic assignment rules. For instance, you can create a group for all new hires by creating a rule based on their 'Date Hired' (assuming you have added the field in their user profile). These groups can be used for enrolment and reporting purposes.
User Enrolments
To see the User Enrolments report, choose a user you want to see the enrolments report from the top of the page. You can also enrol users via the Actions menu here. When selecting a course, you can edit the enrolment of the selected user, re-enrol the user, or un-enrol them.

Reports
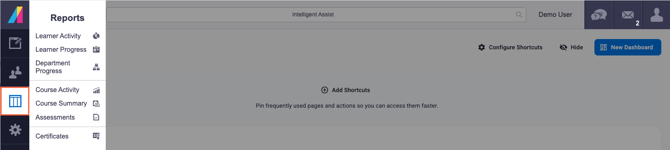
The Reports menu has multiple different reports on Learner Activity and Progress, Department Progress, Course Activity and Summary, as well as Assessments and Certificates reports.
The reporting provides visibility into learner engagement, course performance, and organisational progress. The reports below are the most commonly used for monitoring learning activity and outcomes.
Most reports include filtering options to refine results, as well as export functionality for sharing, analysis, and record-keeping.
-
Learner Activity report
-
Track learner engagement across courses, including enrolments, progress, completions, and overall activity.
-
-
Learner Progress report
-
Monitor individual learner progress to identify completion status, outstanding training, and learning trends.
-
-
Department Progress report
-
View training progress at a department level to understand completion rates, compliance status, and areas requiring attention.
-
-
Course Activity report
-
Track learner activity within courses, including enrolment, progress, completion, and engagement trends.
-
-
Course Summary report
-
Get a high-level overview of course performance, including enrolment numbers, completion rates, and learner outcomes.
-
-
Assessments report
-
Review assessment results, scores, and learner performance to measure knowledge retention and identify areas for improvement.
-
-
Certificates report
-
Monitor certificate issuance and completion records to verify learner achievements and compliance requirements.
-
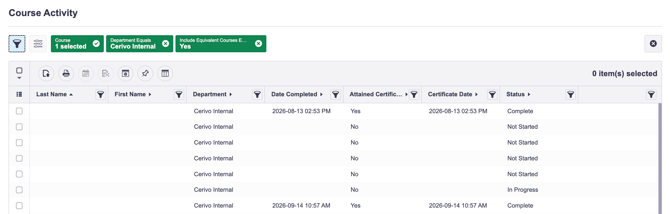
For example, a useful report to seeing learner progress in a single course (and the equivalent course in other languages) is the Course Activity report. The filtering, changing column view and saving report layouts applies to other reports too.
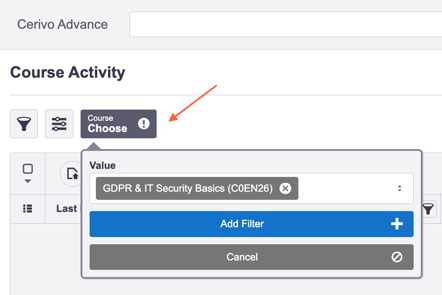
Choose the course you wish to see the course activity in from the top filter. Click Add filter.
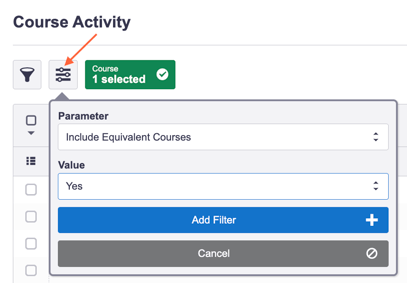
If you have courses in multiple languages and want to see the activity across different language versions in the same course, choose also the Include Equivalent Courses - Yes filter. Click Add filter.
Now, you will see data from all the learners who are enrolled to the selected course.
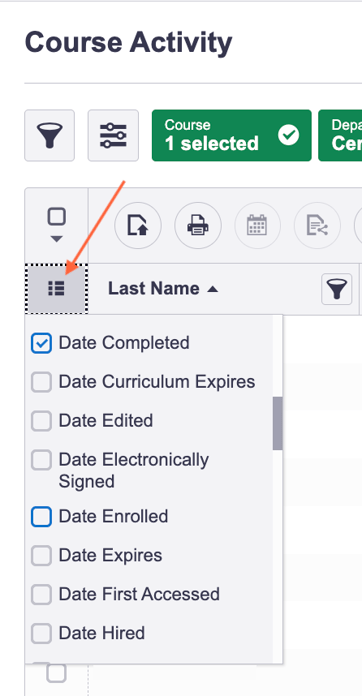
You can change the overview by clicking the Display columns icon and selecting any column data you want to see in the overview, for example adding the Date enrolled, Course name, or Course language.
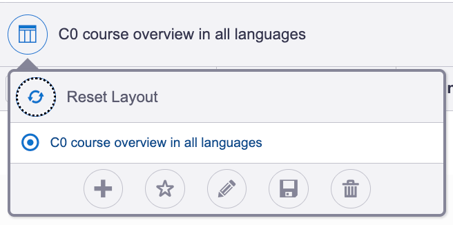
You can also save the layout that you have just created so that you can use it later. Click the Report layouts icon and click Create New to add the new layout with the filters and columns you have created.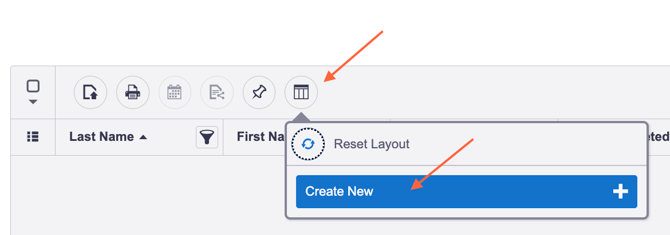
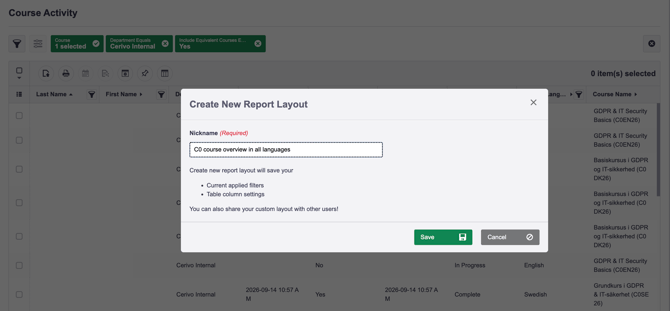
Give it a name and click Save.
Now, you can always see the saved report view from the Report layouts icon, create new ones by clicking the + icon, star them, edit them, save them or delete them.
Setup
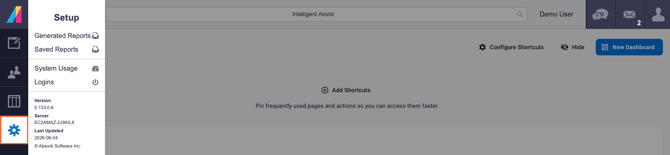
In the Setup menu, you have options Generated Reports, Saved Reports, System Usage and Logins. These reports give you an overview of reports use, system use, and logins.
-
Generated Reports
-
Access to reports that have been previously exported or downloaded. These can be downloaded in their original format and contain the data captured at the time the report was generated.
-
-
System Usage Report
-
An overview of learner engagement across the learning platform, helping administrators understand how different departments are using training resources and identify opportunities to increase participation.
-
The report includes metrics such as course completions, enrolments, lessons accessed, instructor-led training participation, and overall learner activity. Results can be filtered to focus on specific departments or usage trends.
-
This report is particularly useful for tracking adoption, measuring engagement, and comparing learning activity across departments.
-
-
Logins Report
-
Provides insight into learner engagement by tracking login activity across the learning platform. Administrators can use this report to monitor platform usage, identify engagement trends, and understand how frequently users are accessing training over a selected period.
-
The report includes details such as login date and time, username, and whether each login attempt was successful. Results can be filtered and exported for further analysis
-
-
- In addition to reviewing login activity, administrators can quickly access related user information, including training history and enrolment records, directly from the report.
Any questions? Contact us at support@cerivo.com!